School

Everlyn started school. I felt like I really needed to contribute more financially, so I got a part-time job working for my mom and put Everlyn in school part-time. Now, I’m barely making any more money than I was staying home since I have to pay for her school, I think it ends up being a little less than $50 more a week. But Everlyn LOVES school. There is no way I can take her out of school because she loves it so much. Even if it doesn’t really make much financial sense, I love how happy she is going to school. I am also so thrilled with the school I chose for her. They have curriculum, small classes, and her teacher is way more creative than I am and she comes home with the cutest projects all the time. You all know how much difficulty I’ve had with getting Everlyn to nap and sleep, well she’s already napping at school! Her teacher is amazing. I’m raving.

I know a lot of my friends, and myself included were/are really nervous to put our kids in school because you just don’t really know what you’re getting in to at first. Germs and bad teachers and wondering if they will just sit around or actually learn things and everything else that we worry about as parents. But now that I did it, I am so happy. I can come home from work and eat lunch and clean up and do whatever I need to get done, and then I can go pick up Everlyn knowing she had a great day, that she ate, that she napped. So I think I just wanted to share this to maybe ease some other moms worries about school. Also, I’ll note that this is not a daycare program, it is a preschool. Preschools have to follow certain guidelines, requirements and curriculum. I would recommend school over a daycare any day.

But now I’m just going to share some wonderful pictures I took of Everlyn at school and some that her teacher took and sent me!


Chalkboard Table

Last weekend we made Everlyn a chalkboard table.

My mom gave us this old recliner chair she didn’t want anymore, and to make room for it, we had to get a smaller coffee table. So with our old coffee table and a few pieces of wood, we made Everlyn her own chalkboard table and bench. IMG_7215Table: I primed the table with a primer made for smooth wood or painted wood so I didn’t have to sand it. I used blue paint, which I had to cove the bottom of the table and the legs. I bought black chalkboard paint from Home Depot and painted 3 layers on the top of the table. Once it was dry, I had to wait 3 days to use chalk on it. I covered the whole thing in a thin layer of chalk first, and then erased it and let Everlyn draw on it. I was able to wash it off with water after 7 days.

Bench: Cade cut the wood in the right sizes for me and cut off the corners. I had to file the wood and sand it to make it smooth. Once all the was done I primed all the wood, and then painted it and then Cade used his drill to put it all together. I was amazed that it can actually hold MY weight.


10710565_10203207134274713_3007731768967884206_nThis project really wasn’t as hard or as expensive as I thought it would be, but keeping in mind we did already own the table, the saw, the paint and the drill. I only had to buy two pieces of wood for the bench, primer, chalk paint, a file and screws.

10520088_10203207134754725_9114144397541856088_nSeeing this little girl light up to have something she can color on all the time made me so happy that all the hard work was definitely worth it. She is such a little artist.

Halloween Party

I love Halloween, and we go all out every year decorating so I decided this year we would have a Halloween party. I wouldn’t have to worry about the decorations because we already had them. So this week we had a little party for Everlyn’s little friends. It was costume optional, and since I handmade Everlyn’s costume this year and it cant be washed without ruining, she didn’t wear a costume. I went all out with the Halloween themed food but I really blew it because I didn’t take individual pictures of everything to share with you on here. I have pictures of the whole spread and will list everything I did and hopefully you can find it on the table for pictures of it.

IMG_7226Okay, here is the spread.

Mummy Juice Boxes

Jack-O-Lantern Diced Peach Cups

Ghost String Cheese

Apples & Caramel Platter (from Publix)

Crackers & Spinach Dip

Mummy Pizzas

Mummy Hot Dogs

Pumpkin Candy

Graveyard Pudding Cups

Jack-O-Lantern Oranges

Cookies

Pumpkin Min Muffins

Mini Cupcakes

Pumpkin Applesauce Pouches

Candy

So I guess I’ll just go through the list. I managed to get a few individual pictures, which I’ll post as I go.

IMG_7219

Mummy Juice Boxes: I covered juice boxes in white crete paper from Party City. I used tape to make it stay put. I also used tape to stick the straws back onto the backs of the juice boxes and then glued google eyes to them. The kids really liked these.

IMG_7216Here are the Mummy Juice boxes all together, and the Jack-O-Lantern diced peach cups. All I did for those was draw pumpkin faces onto peach cups with permanent marker.

IMG_7224Ghost String Cheese: I just used marker to draw two eyes and a mouth onto the package

Pizza Mummies: I used English Muffins for the bread and spread tomato sauce over each one. I then cut sliced mozzarella cheese into small strips and placed them on top of the sauce to look like a mummy. I used pre-sliced black olives to look like eyes and baked in the oven for about 10 minutes on 350 degrees.

IMG_7225Mummy Hot Dogs: For the hot dogs, I used Pillsbury French bread. I spread it out into one long sheet, uncooked, and sliced it into small strips. I then wrapped the dough strips around uncooked hot dogs. I placed these in the oven on 350 degrees for 15 minutes. When they were done I used a toothpick to dot mustard on them to look like eyes.

Graveyard Pudding: I made the pudding from those pre-packaged puddings. I had to ignore the directions and use less milk than it said because the pudding didn’t come out thick enough the first time. It needed to be thick so the ghost and pumpkin wouldn’t sink into it. I separated the pudding into small cups, crushed oreos and sprinkled that on top of the pudding. On top of the oreos I put a marshmallow ghost and a pumpkin candy corn candy.

Jack-O-Lantern Oranges: These are hidden behind the ketchup and mustard, but all I did was draw pumpkin faces onto unpeeled clementines (I chose clementines over oranges because they are smaller and easier to peel).

IMG_7218Pumpkin Applesauce Pouch: I cut out pumpkin shapes on construction paper and punched two holes in the top. I used a pipe cleaner to wrap around the applesauce and the pumpkin to just give it a little holiday look.

Everything else on my list was just bought at the store as is.

IMG_7220I also got these cool stick-on covers for the soda and tea from Party City for only a buck or two.

The kids had a lot of fun at the party just playing and eating and having fun. I can’t wait to plan the next party.

Halloween Art

It’s getting close to Halloween and I haven’t yet blogged about our Halloween art! Excuse the bad pictures as today I am being lazy.

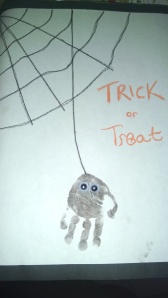
IMG_7207This first one is a spider in a web. Incredibly simple, all the child does is put a black handprint on a piece of white paper. Then the adult draws the web, adds some google eyes and shades in around the web if you wish.

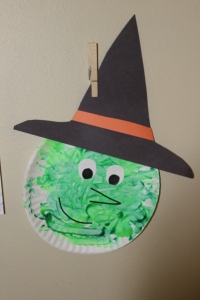
IMG_7206Witch: For this one we used a paper plate and I squirted a few shades of washable green paint on it. Everlyn finger painted it. While it dried I made the eyes out of white paper and black marker. The hat was cut out of black construction paper and I glued on a small orange strip. Once it was dry I glued on the eyes, drew the nose and mouth with black marker and used tape to attach the hat as I find it easier than gluing on the ribbed edges of the plate.

IMG_7208

Pumpkin Patch: I painted each Everlyn’s hands orange and put them onto white paper. Once it was dry I just used marker to draw some leaves on top, grass on the bottom and jack-o-lantern faces. Easy as pumpkin pie.

IMG_7209Ghost: I cut out a ghost shape on white paper and used a paint brush to brush elmers glue all over it (the cotton balls stick to elmers better than a glue stick). I gave Everlyn a pile of cotton balls and let her stick them wherever she wanted on the paper. I cut out black eyes and mouth from construction paper and glued those onto the cotton balls.

IMG_7210Pumpkin: We used a paper plate and I let Everlyn finger paint with orange all over it. I used construction paper to make the stem and vine. You can also cut out jack-o-lantern eyes, nose and mouth and let the child glue them wherever they want on the pumpkin.

IMG_7212Witches: I think these footprint witches are my favorite. I painted Everlyns feet green, and placed them onto white paper. When they were dry I just drew feet, arms, faces, hats and brooms with marker.

These are all the ones we’ve done so far this year, I am planning on doing some more next week, the week of Halloween. But I will also share the art we made last year for Halloween.

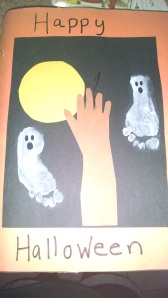
IMG_20141024_131625445This is one we made last year with ghost footprints and a handprint tree. I traced her hand and up her arm on brown paper and cut it out to look like a tree. I glued that onto black construction paper. On a separate sheet of black paper I put her footprints covered in white paint. I cut those out and glued them onto the other black paper. Because she was so young and wiggled a lot doing art, I used the separate paper, older kids could probably do it on the same paper. Yellow construction paper made a moon and you have a Halloween night.

IMG_20141024_131631643This is similar to the one we did this year just a small variation. Instead of the spider being in the web, it is hanging from it. You can’t even tell from these pictures but her handprint was so tiny!!

I will try to post the rest of our projects next week!

Traveling Tots

Recently, we went on a family vacation to Maine. This was the second time we took Everlyn on a plane. The first time, she was a year old. This time she was a year and a half. Before this trip, I researched tips and tricks for traveling with an infant/toddler. A few tricks came in handy, and other advise I seriously disagreed with so anyway, I wanted to share a few things I’ve learned in our travels.

1. Layovers are not a bad thing – Layovers give an energetic child time to run around, play, eat, etc. The first leg of our trip we had an hour layover. The first flight Everlyn watched Frozen on my moms ipad (which is something I never let her do, I hate babies on phones and ipads and such, but to keep a little one happy on a plane we can make exceptions for anything.) Then we had our layover where we ate, got drinks, walked around, Everlyn climbed on the chairs and looked at the planes out the window, and then on our second flight we actually got her to fall asleep. The second leg of our trip we had a 3 hour non-stop flight. This, we realized, was far too long of a flight for a little one. She was restless, wanting to run around the plane. She wouldn’t sit to watch a movie or color or anything.

2. Dum-Dums – I’m talking about the little lollipops. For take-offs and landings these came in handy. I brought a big bag of them and shared them with other kids on the plane to help prevent their ears from popping. The other moms were really grateful and they worked really well.

3. Stickers – For take-offs and landings when you cant have any electronics out is a good time for stickers and coloring. Everlyn is at the age where shes obsessed with stickers. I brought a pad of paper, tons of stickers, crayons and markers. When you can’t distract a little one with a movie or electronic game, don’t forget the stickers.

4. Stroller – A lot of the posts I read before traveling recommended carrying your child or using a carrier. This doesn’t work well for us though because I have a child who will not stay in a carrier and would rather walk than be held. I’ve used a stroller both times I’ve traveled and it has never been a hassle. You can bring it right to the door of the plane and when you get off the plane, its right there waiting for you at the door. It doesn’t get any more convenient. You can put your bags, food, drinks, etc in the stroller too if you don’t have enough hands. I used a small umbrella stroller that easily folds up.

5. Check your baggage – Seriously. One less thing to worry about while maneuvering a child through an airport. We’ve always checked our baggage and it has made all the difference.

6. Backpack Diaper Bag – I switched Everlyn’s diaper bag to a backpack and found it so much more convenient. It is just easier to throw on a backpack through an airport or walking around traveling than carrying those big bulky diaper bags. I made sure to get one with cup holders on the sides so I could easily grab her sippy cup.

7. Trash bag – This time I brought a trash bag, which we used as a dirty clothes bag. Let’s face it, sometimes in our travels we forget what is clean and dirty all packed into our suitcase and then our child ends up smelling like dirty feet. Bringing a trash bag helps keep your bags organized, and keeps those stinky clothes together.

Paper Plate Crafts

IMG_20140819_145824
We have been busy this week with art projects. First we made lots of easy paper plate crafts.
IMG_20140819_075515032 For this frog I just squirted 2 different colors of green washable kids finger paint onto a paper plate and let Everlyn spread it around the plate. After I cleaned her fingers I traced both her hands on green construction paper. While she was busy doing something else, I cut out her handprints and some eyeballs and taped then into the back of the plate. I tried glue at first but they weren’t sticking to the plate well so I ended up taping then which was faster and cleaner anyway. Then once it was all dry I used a black marker to draw nostrils and a smile.

IMG_20140819_075518871IMG_20140819_075506607

For the first butterfly Everlyn used polka dot stampers on a paper plate and for the second one she finger painted with a few colors of pink and purple washable paint. I painted toilet paper rolls for the bodys of the butterflies. I ended up taping black pipe cleaners inside the rolls for antennae. After the paper plates were dry i cut them in half in a squiggley line to make the wings. Then I glued on the eyes and the wings and drew a mouth with black marker.

IMG_20140819_075511650 This sunshine ended up being a lot more or mommy making art than Everlyn making art. I traced her hands on yellow construction paper and cut out a bunch of them. Everlyn finger painted a plate yellow. When it was dry I taped all her handprints to the back of the plate. Of your child is older they can probably paint their own rainbow but I ended up cutting out strips of construction paper (I didn’t have any purple, I know that’s not how a real rainbow goes). I taped those strips onto the back of the plate too. I found the tape so much easier than glue. Then I just added some large Google eyes and drew a smile. This masterpiece is now hang in up at my moms Solar company.

IMG_20140819_075501597 For the bird I had Everlyn finger paint a paper plate. Once it was dry, I cut it in half and let er pick out feathers and place them onto the plate. After she was done placing them, I glued them on with Elmer’s. I taped some feathers onto the back to make hair and pipe cleaners to make tail feathers. I glued on eyes and a small piece of orange construction paper to make a beak.

IMG_20140819_075455346 This is her dream catcher. She finger painted a plate and when it was dry I cut out the center. I let her pick out the string color she wanted to use and the beads and feathers but I put it together. I poked holes around the plate and weaved the string through. I poked more holes at the bottom and hung string from them. I added beads an feathers and tied the bottoms.

Child-Rearing

It still scares the living beegeezus out of me that I am 100% in charge of someone else’s life and well-being. I’ve had dogs for years, but it just doesn’t seem the same. Dogs can be pretty self-sufficient, you don’t need to teach them how to eat their kibbles. But a human life, in my hands, who in their right mind would trust me with this responsibility. I don’t even trust myself.

I still consider myself too young to have a kid, even though my friends are actually starting to have babies on purpose now. It’s not so much my age, or maturity level, it’s just that I wasn’t ready. I don’t know if you ever are, really.

I had a nice reminder of Everlyn’s younger days a few nights ago. She was sick, and I was too, but minutes after taking Nyquil and falling fast asleep, little Everlyn wakes up. I tried giving her a paci and settling her back in her bed, no. I tried rocking her, no. I tried taking her into my bed with me, no. I tried watching Scooby Doo with her, no. I tried rocking her again, no. I tried driving her around town, yes. Finally she fell asleep in the car and I managed to get her safely into bed without waking her. Mission accomplished, no. Minutes after crawling back into my bed, she wakes up again. I end up crawling into her teeny tiny toddler bed with her and falling asleep by her side. I was so incredibly uncomfortable after about 30 minutes but didn’t dare get up. Eventually I managed to climb out of the bed without waking her and got back into my bed around 5 AM to finally go to sleep. It reminded me so much of her colic days. When it was impossible to get her to sleep, when she was always sick, when I didn’t get any sleep. Its crazy to me how easily I can forget those things. And even now, after the fact, when I talk about it, I don’t even remember it as bad as I know it was. I remember the feelings, the constant stress, worry, exhaustion, frustration. But somehow, all that gets pushed aside.


Tough Kid

I am repeatedly amazed at how tough my little girl is. This kid is the most accident-prone child I’ve ever seen in my life, so I guess she has to be tough. It’s funny though, her lack of grace makes her middle name, Grace, totally ironic.

We were at a play date the other day, and true to form, Everlyn was a mess that day, she slammed her fingers in the drawers twice, somersaulted down a step, tripped into a stone fireplace bench thing, and slipped and fell in a puddle outside on the patio. Me, I’m used to this kind of thing with her, but I was kind of shocked at how the other moms reacted to it. When she fell on the patio, which was probably the worst of the spills, one of them panicked more than I did, another offered to pay for her doctors bill, and the other asked me how I was handling it so well. I wasn’t even worried. Maybe that’s bad. But Everlyn is one big bump and bruise so I think we are both used to it.

The other day she was running outside, slipped and cut her knee, got back up and kept running, no tears whatsoever. She didn’t even flinch, just kept on going. This past Sunday, she got stung by a wasp at Cade’s softball game, whined for maybe 15 seconds and was over it. A grown adult who also got stung cried and whined for at least 5 minutes. Today she fell over in a chair and it landed on top of her fingers, pinching them. The other moms around panicked, but Everlyn was over it before they were.

Writing this, I realize I sound like a totally horrible mother, just letting my kid get hurt everywhere she goes like I’m not even watching her. I do watch her, but she is independent and likes to do her own thing so I’m not going to stifle that. I give her space, and sometimes she gets a little banged up. I don’t just let her do anything she wants though, I would never let her be in a dangerous situation or let her run around somewhere where something could seriously hurt her.

I don’t know if she just has a high tolerance for pain or if she’s just easily distracted or if it’s just her stubbornness not going to let anything get in her way, but she seriously does continue to impress me with how tough she is.

Art Display

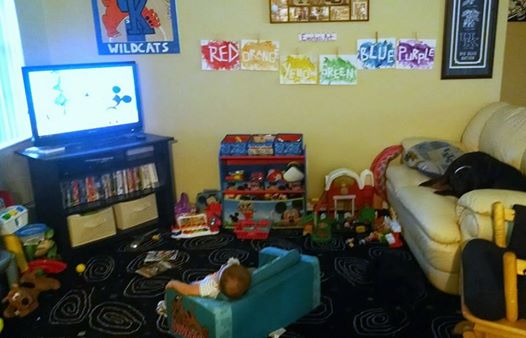
A lot of people ask me what I do with all Everlyn’s artwork. I used to just hang the most recent ones on the refrigerator and then put the ones I want to save for her into an art binder but my fridge was filling up too quickly so I created an art wall in her play area. Yeah, I rearranged my house to give her a play room.

10386375_10202704733835016_132322634924305_n

This is her playroom and her art wall. I just used double-sided tape to attach some clothespins to the wall and wrote “Everlyn’s Art” above it. Her wall can hold 6 small pieces of art or 3 large ones.

The art in the picture is one of her most recent projects, her color rainbow. I used blue painters tape to spell out each color and had her finger paint each one the appropriate color. I like this one because even though she can’t read yet, it is subconscious word/color association.

While I was setting up this project I was calling her over to the table like, “Everlyn! Everlyn come here! Come on Everlyn!” and she was just ignoring me until finally I said, “Everlyn do you want to color?” and she came running over and tried climbing up into her high chair where she does her art. To her “color” means paint, color, stamp, etc. I think I have created a little art monster.

We did do another art project but I can’t post about it yet because we made it for someone and they haven’t received it yet so I don’t want to spoil the surprise.

As I’m writing this she has brought me over crayons, markers and painters tape… I can tell what she wants to do instead of taking her nap.